Go to Main Content Go to Footer

How to Set Up a High Voltage Output Electric Fence?

Setting up a high voltage output electric fence can seem daunting. However, it plays a crucial role in protecting property. This type of fence is highly effective for livestock containment and security. Ensuring the right installation process is vital.

Choosing the right components is essential. You need quality insulators, wires, and energizers. Installation requires careful planning and attention to detail. Even a minor mistake can lead to inefficiencies. For example, improper spacing might reduce the fence's effectiveness.

Safety should always be a priority. High voltage electric fences can pose risks. Awareness of local regulations helps prevent issues. Review installation steps thoroughly, and ensure you understand the requirements. With some effort and care, a high voltage output electric fence can serve your needs well.

How to Set Up a High Voltage Output Electric Fence?

Understanding High Voltage Electric Fences and Their Applications

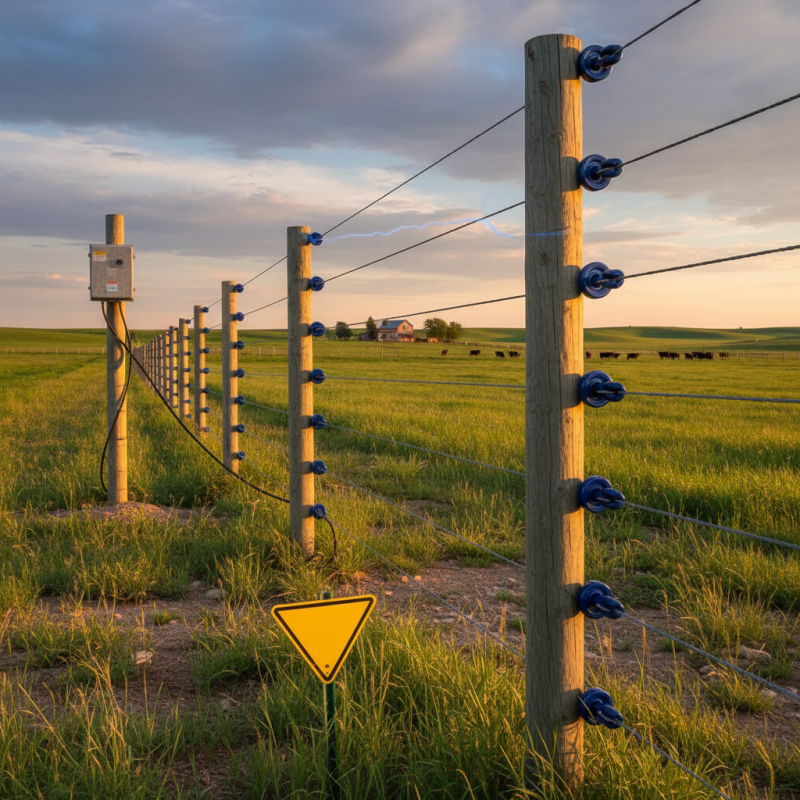
High voltage electric fences are used for various applications. They are commonly seen on farms and in industrial areas. These fences provide a robust solution for keeping livestock in and predators out. Their effective design can deter intruders while being safe when used correctly.

Understanding the operation of a high voltage fence is crucial. The electric pulses travel along the wire, delivering a sharp but brief shock. This shock is enough to deter animals and intruders but not enough to cause serious harm. Proper installation is essential. Any gaps or improper grounding can reduce effectiveness.

Maintenance is often overlooked. Regular checks are needed to ensure all components work well. Pay attention to vegetation. Overgrown grass or branches can interfere with the fence. Sometimes, users might forget about weather conditions, which can affect performance. A fence may need adjustments after heavy rain or storms. These practical details can make a difference in the fence's reliability and functionality.

Essential Tools and Materials Needed for Installation

When setting up a high voltage output electric fence, having the right tools and materials is crucial. You'll need an electric fence charger, insulators, and a variety of fence posts. The charger powers the fence, so choose one that fits your needs. Insulators secure the wire to the posts. Make sure to select durable insulators that can withstand the elements. This investment pays off in the long run.

Wires are also essential. Opt for high-tensile wire for better durability. You’ll need tensioners to keep the wires taut. Ground rods are another critical component. They help stabilize the electric charge. Sometimes, reaching deep into the ground for proper grounding can be a challenge.

Don’t forget safety gear. Gloves and protective eyewear should be part of your installation kit. Familiarize yourself with local regulations regarding electric fences. Missteps can lead to safety hazards or legal issues. The installation process may seem straightforward, but overlooking small details can lead to problems later. Stay vigilant and ensure everything is done correctly.

Step-by-Step Guide to Planning Your Electric Fence Layout

Planning your electric fence layout requires careful thought. Start by assessing the property. Identify areas that need protection. Consider the type of animals you'll keep and any potential hazards. Measure the perimeter where the fence will be installed. Knowing these details helps ensure that your fence serves its purpose.

Next, think about the spacing of the fence posts. Posts need to be sturdy yet not too far apart. A distance of 10 to 12 feet is often ideal. This spacing supports the wire and keeps it taut. Remember, uneven terrain can affect the layout. If your land has hills or dips, adjust the positioning accordingly.

It’s essential to think about the power source for your fence. Will you use solar panels or a mains outlet? Each option has its benefits and some drawbacks. You may want to test different setups. Sometimes, the ideal arrangement isn’t obvious at first. Walk the perimeter again before finalizing your plan. A well-thought-out layout is the backbone of a successful electric fence installation.

Electric Fence Voltage Output by Distance

This bar chart illustrates the voltage output of an electric fence across various distances. The data shows how voltage output decreases as the distance increases, which is critical for planning your fence layout.

Installing the Electric Fence: Key Steps and Best Practices

Installing a high voltage output electric fence requires careful planning and execution. First, assess the area needing protection. Accurate measurements will help determine how many posts and wire you'll need. According to recent studies, a well-structured fence can deter over 90% of potential intruders. This data indicates the effectiveness of electric fencing in agricultural settings, enhancing security for crops and livestock.

When setting up, prioritize the spacing of your posts. Most recommendations suggest spacing them no more than 10 feet apart. This spacing ensures proper tension and stability, reducing the risk of sagging wire. Using high-tensile wire can increase durability. However, it's crucial to remember that even the best materials require regular maintenance. Regular checks may reveal areas needing repair, which can often be overlooked.

Don't forget to set the correct voltage. A voltage range of 4,000 to 10,000 volts is typically effective. However, exceeding the necessary voltage can attract unwanted attention and cause harm. Understanding the balance between effectiveness and safety is essential. Be mindful that your installation must comply with local regulations. Overlooking these details can lead to unintended consequences, complicating your efforts and potentially leading to fines or safety hazards.

How to Set Up a High Voltage Output Electric Fence? - Installing the Electric Fence: Key Steps and Best Practices

Step Description Materials Needed Safety Tips
1 Select the installation site and plan the layout of the fence. Measuring tape, markers. Ensure the area is free of hazards.
2 Install fence posts at regular intervals. Wooden or metal posts, post hole digger. Wear gloves and protective gear.
3 Attach the high-voltage wire to the posts. High-voltage wire, wire connectors. Handle wires with care to prevent electric shocks.
4 Connect the energizer to the fence wire. Electric fence energizer, grounding rod. Ensure the energizer is correctly grounded.
5 Test the fence for proper voltage output. Voltage tester. Check voltage at multiple points along the wire.
6 Regular maintenance and inspections. Inspection tools, maintenance schedule. Always disconnect power before maintenance.

Safety Precautions for Operating a High Voltage Electric Fence

When setting up a high voltage electric fence, safety must be a top priority. The U.S. Department of Agriculture reports that improper handling of electric fences can lead to serious injuries. Ensuring the fence is properly grounded can minimize shock hazards. This involves checking the grounding rods and connections regularly.

Wearing safety gear is crucial. Heavy gloves can protect against accidental shocks. Awareness of weather conditions plays a role too. Rain can increase conductivity, posing a greater risk. Additionally, keeping a safe distance from the fence is essential, especially during storms.

Many experts recommend using warning signs. This informs the public about the potential dangers. In remote areas, wildlife may be affected. They can try to escape, leading to unintended consequences. It’s important to factor in these elements during installation and maintenance. Always remember, a well-maintained fence is safer. Regular inspections can prevent unforeseen issues.

Logo Access 360